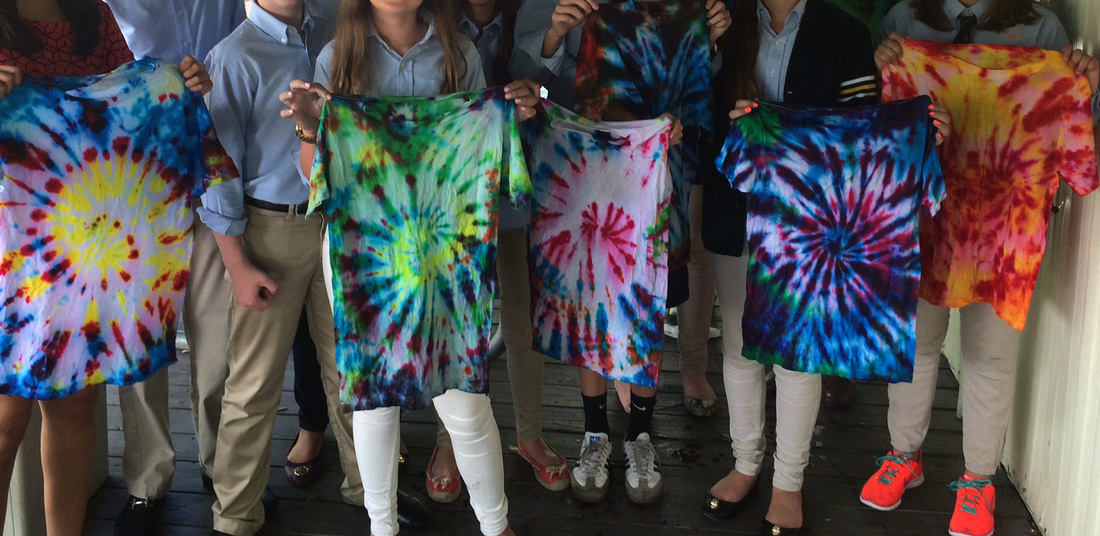
For our last two days of class, we tie dyed shirts! I showed them a few tying techniques. Some students tried those, while some experimented with others! Here's a picture of a few of these shirts. It has been a fun and exiting school year with my students. Have a great summer, and see you in August!!
0 Comments
I can't believe it's almost the end of the year! The school year definitely flew by! For our last long project, we created weavings. I got the opportunity to show my students pictures of the weaving process from my trip to the highlands of Guatemala. Students learned how time-consuming the weaving process is, and how the community collaborates to create weavings in Guatemala. I introduced students to a few basic weaves and some more advanced ones, including the diagonal weave and the rya weave. Then student sketched out their designs, and wove away!
In between the last few longer projects, I had my students do a short project that they could give to their Moms on Mother's Day! Students created various yarn weavings called God's Eyes, which traditionally serve as spiritual objects and symbols for the Huichol people of Western Mexico. Students made ones of different sizes using yarn on bamboo skewers, popsicle sticks and toothpicks. Once they finished their individual pieces, they tied them together in a mobile.
We learned about the history, origins and purpose of the holiday, Cinco de Mayo, and then created our own maracas! First, we did 3-4 layers of paper mache on balloons, leaving a small opening around the tie of the balloon. Once they dried, we popped and removed the balloon from the small hole we had left. Through that hole, we then filled our piece up with rice grains, beans, rocks, and popcorn seeds, experimenting with the sounds that each of them made. We put a piece of paper over the hole and taped it shut. Then, we each took an empty paper towel roll, cut slits at the top, and attached it to the bottom of the maraca, as a handle (I had been collecting them since the beginning of this school year...glad I found a good use for them). Then we added a few layers of paper mache on the handle. When they were dry, the students painted and glued on their designs!
We did two recycled art projects in my middle school elective classes, to celebrate Earth Day. My sixth graders are on a field trip, but when they come back we will be making centerpieces with recycled materials. For the first project, my students and I collected empty plastic bottles (tons of them) from our homes, and from other faculty and staff. Then we painted and cut the bottles, and attached them on chicken wire to make a collaborative hanging sculpture in each class, in the style of Dale Chihuly's glass chandeliers. My students always love looking at Chihuly's work, and after they did, they had a lot of ideas! Students of each class decided on a color scheme for their sculpture. One class decided on a pastel color scheme, another chose cool colors, and the last one decided to do rainbow colors arranged in the proper order. Collectively, we decided to hang them outside of the art trailers, so they would function as shades for the people who sit outside in the hot Miami weather! The other project was inspired by a huge, inspiring, worldwide public art project called the Cool Globes, that began in Chicago in 2007 to raise public awareness of solutions to global warming. After much brainstorming and thinking, students came up with a design for their own mini-globe that creatively illustrated at least one solution to climate change. Then we built the globes using paper mache, paint, collage and a range of other materials, depending on their individual message. I did not get a chance to photograph all of them before they took them home, but here are a few. The young lady who did the globe in the first few pictures even won an award for her work! So proud of her and all of them for their ideas and hard work.
I have been wanting to do a project with an art history and research component. So, for the next project the students researched the work of an artist who inspires them, and came up with a mask design that reflected the style of the artist they chose. Then, we looked at the work of George Segal, a plaster artist known for his life-size plaster sculptures of people. To build their masks, students paired up with a classmate, and build the masks with plaster on each others' faces! Yes, you read that right! To protect their skin, they put a layer of plastic wrap on their faces, punching holes where the nostrils were, before plaster was put on them. Afterwards, some students built and attached other plaster shapes on their masks. When the masks dried, they painted on their design. Here are pictures of what the young artists came up with!
From last weekend until the middle of this week, I got to chaperone the 8th grade history and government Close Up trip to DC. It was a blast! Here is some more information about the Close Up educational programming. Some pictures... Also this week was the annual Diocesan festival in which students and some teachers from all the Episcopal schools in Miami-Dade county come together for participation in special educational programming, in several categories. These include visual and performing arts activities, math, science experiments, technology, languages, community service, etc. Each year, I select a student from my classes to go with me to participate in art portion of the festival. This year, the festival was at St. Thomas Episcopal School in Coconut Grove. My student artist did very well! They all built plaster figures inspired by the work of several plaster artists. And here are all the finished pieces!
We got back from spring break this week. While I was doing some spring cleaning, I found many of my old CDs, many of which were scratched. Like many other art teachers, I have trouble just throwing things out. I thought this would be a great opportunity for doing a re-purposed material art project. I gave each of my 7th and 8th grade student a CD, and on the shiny side students used permanent markers to draw out their visual interpretation of a lyric from a song of one of their favorite musicians. After some trial and error, I learned that non-Sharpie permanent markers worked best. The students loved working on such a non-traditional surface! The colors showed up bright and shiny on the silver side of the CD. When we all finished, we tied them together and made a window curtain out of them. It's a bit hard to see, but here is a picture of the work in progress.
As an extension of the printmaking unit, we worked on a leaf printing project. On the first day, we took a walk around the beautiful school campus and collected a variety of leaves that had fallen to the ground. Then, we came back to the classroom and created crayon rubbings of the leaves for the first layer. The next day, students arranged their leaves on their piece, and used watercolor to paint the negative space around the leaves. The crayon rubbings from the last day showed through the watercolor (the resist technique). For our final layer, we applied the left over block printing inks on our leaves, and printed them on our pieces. I loved that the students were very creative and thoughtful about the composition!
We looked at the work of Pop artist Andy Warhol, and they they created Pop Art versions of themselves. We used various watercolor techniques to create the backgrounds for the prints, while I took close-up pictures of each student. Working from their picture, they drew a simplified version of themselves and transferred it onto a linoleum block for carving. After they carved all negative spaces, they made about 6 prints onto their watercolor backgrounds. They chose their four favorite, and collaged them together onto a final piece of paper. Here they are!
|
AuthorI am an art educator and artist who loves to share the amazing creations and learning happening in my courses. Here is a sneak peek of what my students are learning and creating! Categories
All
Archives
May 2022
|